[ad_1]
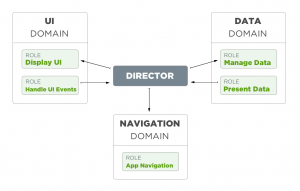
Within the earlier article we launched VIPER-S, with an summary of its Domains and Roles, we organized our modules with folders and we began writing the contract for the “ItemsList” module. With this new article we’ll full the structure by implementing the Actors. An Actor is the entity accountable for the implementation of all of the Roles for a selected Area that, as it’s possible you’ll bear in mind from the earlier article, are outlined by the protocols within the Contract file. That being stated, we’re going to implement every Actor utilizing these protocols and connecting Actors to one another as a way to obtain the structure’s circulate. Right here’s the circulate overview once more for a fast assessment.

ACTORS: THE WORKER
With the earlier article we have now launched the time period “Employee”. This title is an effective alternative as a result of it defines the category that’s accountable for dealing with the Information area and its roles.
First we outline the file and sophistication names. As per our conference, we use the folder construction for the prefix (Gadgets->Record) and we full the title with the phrase “Employee”, which leads to “ItemsListWorker”. The protocol that we’re going to implement for this actor is “ItemsList_ManageData”.
Sooner or later the employee should talk with one other object which is ready to current data. In our structure this object implements the “ItemsList_PresentData” protocol. Right here is a picture to higher describe the Employee construction.

With this construction in thoughts let’s write the code for the Employee:
class ItemsListWorker {
    let presenter: ItemsList_PresentData!
}

extension ItemsListWorker: ItemsList_ManageData {

    func fetchItems(){

       // get gadgets

       ... code to acquire the gadgets right here ....

       if operationCompleted  {
           presenter.current(gadgets: Gadgets)
       } else {
       // or in case of errors
           presenter.presentError()
       }
    }

    func deleteAllItems(){

       // delete gadgets

       ... code to delete the gadgets right here ....

       if operationCompleted  {
           presenter.presentSuccess()
        } else {
           presenter.presentError()
        }
    }
}
I typically want to separate logics utilizing extensions, so I’ll hold this rule for the remainder of the structure. If the code for a file will get longer than 200 traces, I often create a brand new file with a selected title utilizing extensions. Be at liberty to maintain all of the code in the identical block in the event you want.
The code for this class is easy. Basically we work together with get/set knowledge and, relying on the results of this operation, one other class known as to current the consequence.
Now let’s deal with the “presenter.current(gadgets: gadgets)” name. For those who verify the prototype for the “ItemsList_PresentData” protocol you’ll discover the Merchandise kind. It’s a construction that we use as mannequin for the data retrieved from databases/community/no matter. It’s actually helpful to outline a mannequin to speak between domains as a result of we’re enhancing our contract with extra data that higher defines the communication between actors.
Let’s lengthen the contract file with the Merchandise construction definition: an merchandise has a reputation, a creation date, and may be enabled or disabled.
struct Merchandise{
     let title: String
     var enabled:Bool
     let date: Date
}
ACTORS: THE SCENE
This actor is actually the consumer interface and it covers the UI area. The title for this class, following our naming conference, is “ItemsListScene”.
As we have now already seen for the UI area, the Scene actor has two foremost roles: drawing/updating the UI parts and redirecting UI occasions to an occasion handler. So as to cowl these roles it has to implement the DisplayingUI protocol and it wants to speak with one other object that implements the UIEventsHandler protocol.

Since sooner or later we have now to speak with the iOS navigation circulate, we should be in touch with the beneath UIKit layer and with the default system UI occasions. This actor is subsequently a subclass of UIViewController as a way to create this communication channel. If you’re used to working with MVC, you’ll in all probability discover the restricted accountability set that we’re assigning to the view controller to be actually uncommon.
Let’s see how all this logic finally ends up working in our code:
class ItemsListScene: UIViewController {
    @IBOutlet var desk: UITableView!
    var gadgets: [ItemUI] = []
    var eventsHandler: ItemsList_UIEventsHandler!
}

// MARK: - Show UI
extension ItemsListScene: ItemsList_DisplayUI{

    func show(gadgets: [ItemUI]) {
         self.gadgets = gadgets
         desk.reloadData()
    }

    func show (error:String){
         showPopup(title: “Error”, message: error)
    }

    func displaySuccess(){
         showPopup(title: “Success”, message:”Operation accomplished”)
    }
}

// MARK: - UI Interplay
extension ItemsListScene {

    @IBAction func deleteAll(){
         eventsHandler. onDeleteAll()
    }
}
The code is easy, so we solely must verify what the ItemUI is. As you already know by now, with VIPER-S we need to outline a transparent distribution of duties. That’s why we don’t need to overload the Scene with ineffective data. Its foremost position is to show data, so it expects a mannequin that it could possibly show with none additional motion. The “ItemUI” mannequin is a change of the Merchandise mannequin that we’ve seen with the Employee actor. Let’s add the definition of the “ItemUI” mannequin to the contract as we did for the Merchandise mannequin after which examine the 2.
struct ItemUI {
    let title: String
    let shade: UIColor
    let date: String
}

struct Merchandise {
     let title: String
     var enabled: Bool
     let date: Date
}
As you possibly can see the 2 buildings are barely totally different. Particularly, the “title” is the one unchanged knowledge. For starters, the “enabled” property is not accessible. Additionally, we’re solely going to assign a shade to merchandise state, as a result of we have to discuss in “UI language” right here. The UI doesn’t know what “enabled” means for an merchandise: it simply must know which is the colour to make use of when drawing. The “date” has been transformed from Date to String as a result of it’s the most applicable kind for a label. Extra on this conversion with the Director actor later.
The final a part of the Scene is the code wanted for the Desk datasource and delegate. For those who want, you possibly can add this code to a model new file the place you solely put the code associated to the desk. An excellent title for that might be “ItemsListSceneTable.swift”.
extension ItemsListScene: UITableViewDelegate, UITableViewDataSource {

    func tableView(_ tableView: UITableView,
                   numberOfRowsInSection part: Int) -> Int {
        return gadgets.depend
    }

    func tableView(_ tableView: UITableView,
                   cellForRowAt indexPath: IndexPath) -> UITableViewCell {

        let cell = tableView.dequeueReusableCell(withIdentifier: "Merchandise")
        let merchandise = gadgets[indexPath.row]

        let nameLabel = cell!.viewWithTag(1) as! UILabel
        let dateLabel = cell!.viewWithTag(2) as! UILabel

        nameLabel.textual content = merchandise.title
        nameLabel.shade = merchandise.shade
        dateLabel.textual content = merchandise.date

        return cell!
    }

    func tableView(_ tableView: UITableView,
      didSelectRowAt indexPath: IndexPath) {

        eventsHandler.onItemSelected(index: indexPath.row)
    }

}
Nothing particular occurs on the merchandise drawing aspect: they’re introduced as cells, setting UI parts instantly with the data of the “ItemUI” mannequin.
When a cell is chosen the “eventsHandler” is triggered with the “onItemSelected” occasion.
ACTORS: NAVIGATOR
Right here we implement the roles of the Navigation area. The Navigator actor must implement the Navigate protocol and it wants a reference to the module’s ViewController to simply receive entry to the usual UIKit navigation capabilities.

Let’s verify the Navigation class code one step on the time.
class ItemsAddNavigator: Navigator {
    static func makeModule()-> ItemListUI {

        // Crete the actors
        let scene = instantiateController(id: "Record",
                                          storyboard: "Gadgets”) as! ItemsListScene
        let navigator = ItemsListNavigator(with: scene)
        let employee = ItemsListWorker()
        let director = ItemsListDirector()

        // Affiliate actors
        director.dataManager = employee
        director.navigator = navigator
        director.ui = scene
        employee.presenter = director
        scene.eventsHandler = director

        return scene
    }
}
This class is extending a generic Navigator class that’s only a layer above some UIKit capabilities and that retains a reference to the View Controller module. I’ve solely pasted the attention-grabbing portion of the guardian class right here, however you possibly can verify the remainder of the code within the instance undertaking on github.
import UIKit

class Navigator  {

    weak var viewController:UIViewController!

    init(with viewController:UIViewController) {
        self.viewController = viewController
    }

    static func instantiateController(id:String, storyboard:String, bundle:Bundle? = nil)-> UIViewController{

        let storyBoard = UIStoryboard(title: storyboard, bundle: bundle)
        let viewController = storyBoard.instantiateViewController(withIdentifier:id)

        return viewController
    }

    ... proceed...
Let’s return to the makeModule() operate. Right here we construct the module that we’re discussing: to me it’s fascinating how all of the actors are simply related to one another and the way all of the connections describe the entire structure in a semantic method.
Let’s talk about the implementation of the Employee and the Scene for a second. The Scene is initialized from a storyboard and the Director is its eventsHandler. The Employee on the opposite aspect wants a presenter that, once more, is the Director (we’ll see later that the Director is accountable for the communication between domains, so it’s referenced by many objects).
Right here is the portion of the Navigator class the place we implement the Navigation:
extension ItemsListNavigator: ItemsList_Navigate{

    func gotoDetails(‘for’ merchandise: Merchandise){
        let itemDetail = ItemsDetailNavigator.makeModule(with: merchandise)
        push(nextViewController: itemDetail)
    }

    func goBack(){
        dismiss(animated:true)
    }
}
With the gotoDetails operate we name “makeModule”. On this case we’re utilizing the “makeModule” of the module that we are going to current, acquiring a View Controller that we push to the navigation stack.
The “makeModule” for the ItemsDetail module wants an Merchandise and we will simply present it instantly with the gotoDetail operate. What we see right here is how data may be simply shared between modules utilizing nicely outlined fashions.
ACTORS: DIRECTOR
The director is the mind of VIPER-S. Its first position is to behave as a bridge between all of the domains. It is aware of the way to current knowledge for the Scene, the way to work together with the Employee to get knowledge after a UI occasion, and when it’s time to name the navigator to vary view.
What I really like of protocols is that we will simply obtain louse coupling: the director doesn’t must know which lessons it’s going to name to finish all these duties; it solely wants references to things that implement a number of the protocols outlined within the contract.

Let’s see the code and study what’s wanted for every area, separately:
class ItemListDirector {

    var dataManager: ItemList_ManageData!
    var ui: ItemList_UIDisplay!
    var navigator: ItemList_Navigate!

    // Information
    var gadgets: [Item] = []

    // UI
    var itemsUI: [ItemUI] {

        get {
            return itemsData.map { (merchandise) -> ItemUI in
                return ItemUI(
                              title: merchandise.title,
                              shade: (merchandise.enabled) ? UIColor.inexperienced : UIColor.pink,
                              date: formatDate(merchandise.date),
            }
        }
    }
}
On the high of the category we outline the references to the opposite actors. Word that, as we talked about earlier, the references will not be tips to Scene, Employee or Navigator objects, however simply to things that implement the wanted protocols.
We hold a reference to the record of retrieved Gadgets and we use a very useful dynamic property to convert from Merchandise to ItemUI mannequin.
The director is ready to current knowledge coming from a Employee, so it must implement the ItemsList_PresentData.
extension ItemsListDirector: ItemsList_PresentData{

    func current(gadgets:[Item]){
        self.gadgets = gadgets
        ui.show(gadgets: itemsUI)
    }

    func presentSuccess(){
        ui.displaySuccess()
    }

    func presentError(){
        ui.displayError()
    }
}
With the primary operate we have now obtained some gadgets, so we retailer them and, with the “itemsUI” property, we convert them to a mannequin that may be simply introduced with the UI (on this case the Scene). The opposite two strategies are pass-through to current messages on the UI.
The HandleUIEvent implementation is easy:
extension ItemsListDirector: ItemsList_HandleUIEvents{

    func onUIReady() {
        dataManager.fetchItems()
    }

    func onDeleteAll(){
        dataManager.deleteAllItems()
    }

    func onItemSelected(index:Int) {
        let merchandise = gadgets[index]
        navigator.gotoDetail(for: merchandise)
    }
}
When the onUIReady occasion is obtained, the Director asks the Information Supervisor for the gadgets. The gadgets will likely be introduced with the strategy beforehand outlined with the “PresentData” protocol. When an merchandise has been chosen, the Director will name the Navigator passing the chosen merchandise to indicate the merchandise’s particulars view. After the deleteAll occasion is triggered, the director calls the dataManager to delete the gadgets after which, relying on the results of the operation, the Director will current success or error with the strategies we beforehand described.
Right here is the overview of all of the VIPER-S actors:

With the subsequent and final article within the sequence, we’re going to full the VIPER-S code, studying the way to share data between modules (we launched the subject with the navigator class) and clearly speaking about the way to check this code.
Thanks once more to Nicola for reviewing this text and for his very useful hints!
[ad_2]
Source_link