[ad_1]
Construct a creative digicam and see the way it performs on the A13 Bionic chip’s neural engine
Type switch is a very talked-about deep studying activity that permits you to change a picture’s composition by making use of the visible model of one other picture.
From constructing inventive photograph editors to giving a brand new look to your sport designs by way of state-of-the-art themes, there are many superb issues you may construct with neural model switch fashions. It’s additionally might be helpful or information augmentation.
At WWDC 2020, Create ML (Apple’s mannequin constructing framework) obtained an enormous enhance with the inclusion of favor switch fashions. Although it’s shipped with the Xcode 12 replace, you’ll want macOS Large Sur (in beta on the time of writing) to coach model switch fashions.
Create ML has now unlocked the potential to coach model switch fashions proper out of your MacBook. You may prepare each picture and video model switch convolutional neural networks, with the latter utilizing solely a restricted set of convolution filters to make it optimized for real-time picture processing.
To get began, you want three issues:
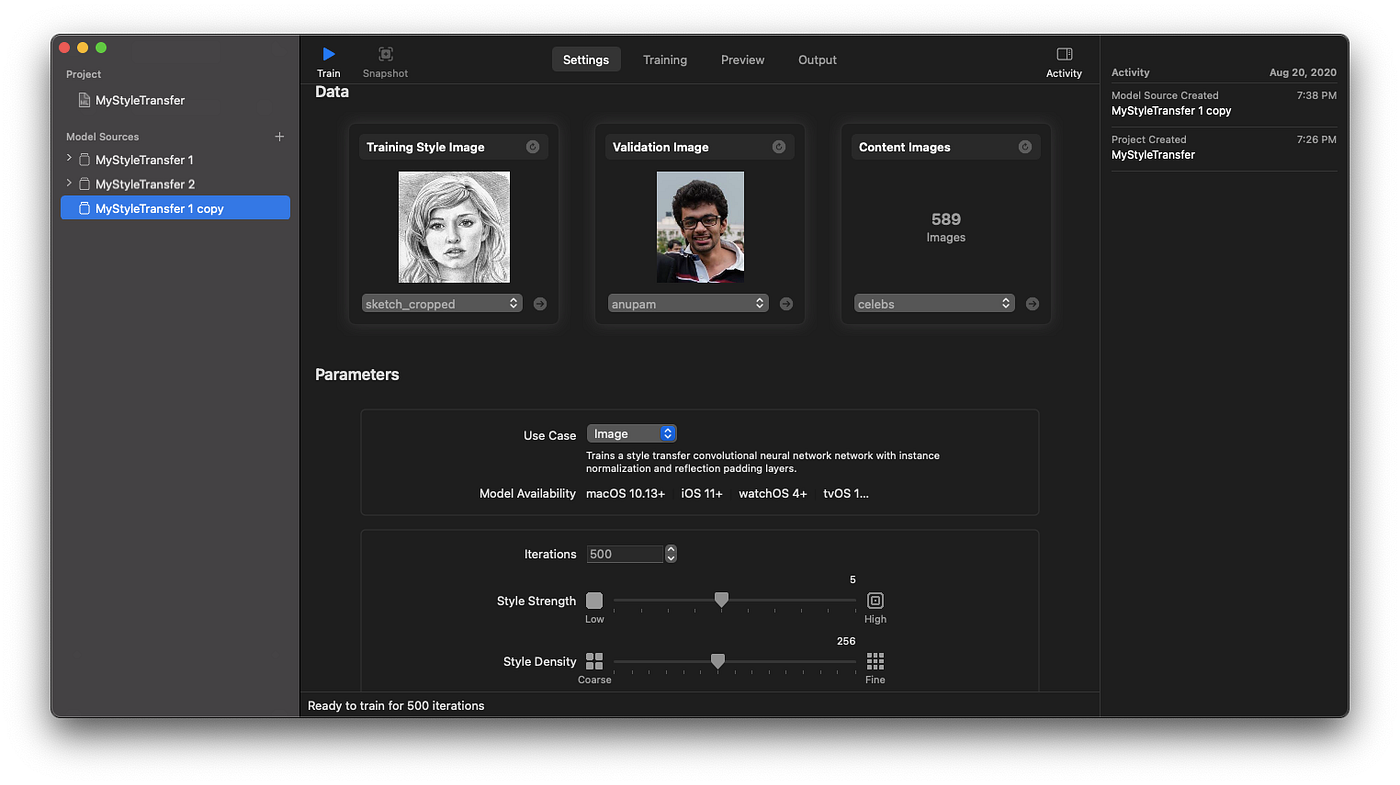
- A styling picture (additionally known as a mode reference picture). Sometimes, you should utilize well-known work or summary artwork photos to let your mannequin be taught and impart the model from. In our case, we’ll be utilizing a pencil sketch picture in our first mannequin (test the screenshot under).
- A validation picture that helps visualize mannequin high quality through the coaching course of.
- Dataset of content material photos that act as our coaching information. To get optimum outcomes, it’s finest to work with a listing of photos just like ones you’d use whereas operating inference.
On this article, I’ll be utilizing this celeb picture dataset as our content material photos.
Right here’s a glimpse at how my Create ML model switch settings tab regarded earlier than coaching the mannequin.
The validation picture under reveals real-time model switch utilized at every iteration interval. Right here’s a glimpse of it:

It’s value noting that the model loss and content material loss graphs are indicators for understanding the stability between the model and content material photos. Sometimes, the model loss ought to lower over time, exhibiting that the neural community is studying to undertake the inventive traits of the model picture.
Whereas the default mannequin parameters work nice, Create ML permits us to customise them for particular use instances.
The low model energy parameter tuned solely the components of the background with the model picture, thereby holding the first topic intact. On the similar time, setting the model energy parameter to excessive would impart extra model textures on the perimeters of the picture.
Equally, coarse model density makes use of high-level particulars of the model picture (such fashions are skilled a lot sooner), whereas high quality density lets the mannequin be taught minute particulars.
Create ML model switch fashions prepare with a default variety of iterations set to 500, which is good for many use instances. Iterations are the variety of batches wanted to finish one epoch. One epoch equals one coaching cycle of the complete dataset. For instance, if the coaching dataset consists of 500 photos and the batch dimension is 50, it signifies that 10 iterations will full one epoch (word: Create ML mannequin coaching doesn’t inform you the batch dimension).
This yr, Create ML additionally launched a brand new function known as mannequin snapshots. These permit us to seize intermediate Core ML fashions throughout coaching and export them into your apps. Nevertheless, fashions used from snapshots aren’t optimized for dimension and are considerably bigger than those generated on coaching completion (particularly, the snapshots I took had Core ML mannequin sizes within the vary of 5–6 MB, whereas the ultimate mannequin dimension was 596 KB).
The next gif reveals one such instance, the place I’ve in contrast mannequin snapshot outcomes throughout completely different iterations:
Do word how on one of many photos, the model isn’t composed on the entire picture. It’s because the styling picture used was of a smaller dimension. Therefore, the community wasn’t in a position to be taught sufficient model data, inflicting the composed picture to be of sub-par high quality.
Ideally, having a minimal dimension of 512 px for the model picture will guarantee good outcomes.
Within the following sections, we are going to construct an iOS utility that runs model switch fashions in real-time. Right here’s a hen’s eye view of our subsequent steps:
- Analyze outcomes throughout three video model switch neural community fashions. One among them is skilled with the default parameters, and the others use the model energy parameters set as excessive and low.
- Implement a customized digicam utilizing AVFoundation in our iOS utility.
- Run the generated Core ML fashions on a stay digicam feed. We’ll use a Imaginative and prescient request to rapidly run, infer, and draw the stylized digicam frames on the display.
- View the outcomes throughout CPU, GPU, and Neural Engine.
Discovering a mode picture that offers good inventive outcomes is hard. Fortunately, I discovered one such picture with a easy Google search.
I’ve already skilled the three fashions with the identical dataset. Right here’s are the outcomes:
As you may see above, the low-strength mannequin hardly impacts the content material photos with the given model picture, however the excessive energy one does refine the perimeters with extra model results.
And with that, we have now our fashions (roughly a half MB in dimension) able to ship into our app.
Create ML additionally lets us preview video outcomes, but it surely’s extremely sluggish. Fortunately, we’ll see them in real-time in our demo app shortly.
AVFoundation is a highly-customizable Apple framework for media content material. You may draw customized overlays, fine-tune the digicam settings, do photograph segmentation with the depth outputs, and analyze frames.
We’ll primarily deal with analyzing frames, and particularly reworking them utilizing model switch, and displaying them in a picture view to construct a stay digicam feed (you can too use Metallic for additional optimization, however for the sake of simplicity, we’ll skip that for this tutorial).
At a really fundamental stage, constructing a customized digicam entails the next elements:
AVCaptureSession— this manages the entire session of the digicam. Its performance entails gaining access to the iOS enter gadgets and passing the info to output gadgets. AVCaptureSession additionally lets us outlinePresetvarieties for various seize periods.AVCaptureDevice— lets us choose the entrance or again digicam. We will both decide the default settings or useAVCaptureDevice.DiscoverySessionto filter and choose hardware-specific options, such because the TrueDepth or WideAngle cameras.AVCaptureDeviceInput— this gives the media supply(s) from a seize system and sends it to the seize session.AVCaptureOutput— an summary class that gives the output media to the seize session. It additionally lets us deal with the digicam orientation. We will set a number of outputs (corresponding to for digicam and microphone). For instance, for those who’re trying to seize photograph and films, addAVCaptureMovieFileOutputandAVCapturePhotoOutput. In our case, we’ll be utilizingAVCaptureVideoDataOutput, because it gives video frames for processing.AVCaptureVideoDataOutputSampleBufferDelegateis a protocol we will use to entry each body buffer contained in thedidOutputdelegate methodology. To be able to begin receiving frames, we have to invoke thesetSampleBufferDelegatemethodology onAVCaptureVideoDataOutputAVCaptureVideoPreviewLayer— principally aCALayerthat visually shows the stay digicam feed from the output of the seize session. We will remodel the layer with overlays and animations. It’s essential to set this for the pattern buffer delegate strategies to work.
To begin off, add the NSCameraUsageDescription digicam permission in your challenge’s information.plist file in Xcode.
Now, it’s time to create an AVCaptureSession within the ViewController.swift :
let captureSession = AVCaptureSession()
captureSession.sessionPreset = AVCaptureSession.Preset.medium
Subsequent, we’ll filter and choose the wide-angle digicam from the listing of obtainable digicam varieties current within the AVCaptureDevic occasion and add it to the AVCaptureInput, which in flip is ready on the AVCaptureSession:
Now that our enter is ready, let’s add our video output to the seize session:
let videoOutput = AVCaptureVideoDataOutput()videoOutput.alwaysDiscardsLateVideoFrames = truevideoOutput.setSampleBufferDelegate(self, queue: DispatchQueue(label: "videoQueue"))if captureSession.canAddOutput(videoOutput){
captureSession.addOutput(videoOutput)
}
The alwaysDiscardsLateVideoFrames property ensures that frames that arrive late are dropped, thereby guaranteeing there’s much less latency.
Lastly, add the next piece of code to stop a rotated digicam feed:
guard let connection = videoOutput.connection(with: .video)
else { return }guard connection.isVideoOrientationSupported else { return }
connection.videoOrientation = .portrait
Notice: To be able to guarantee all orientations, that you must set the
videoOrientationbased mostly on the system’s present orientation. The code is on the market on the finish of this tutorial.
Lastly, we will add our preview layer and begin the digicam session:
let previewLayer = AVCaptureVideoPreviewLayer(session: captureSession)view.layer.addSublayer(previewLayer)captureSession.startRunning()
Right here’s a take a look at our configureSession() methodology that we’ve simply created:
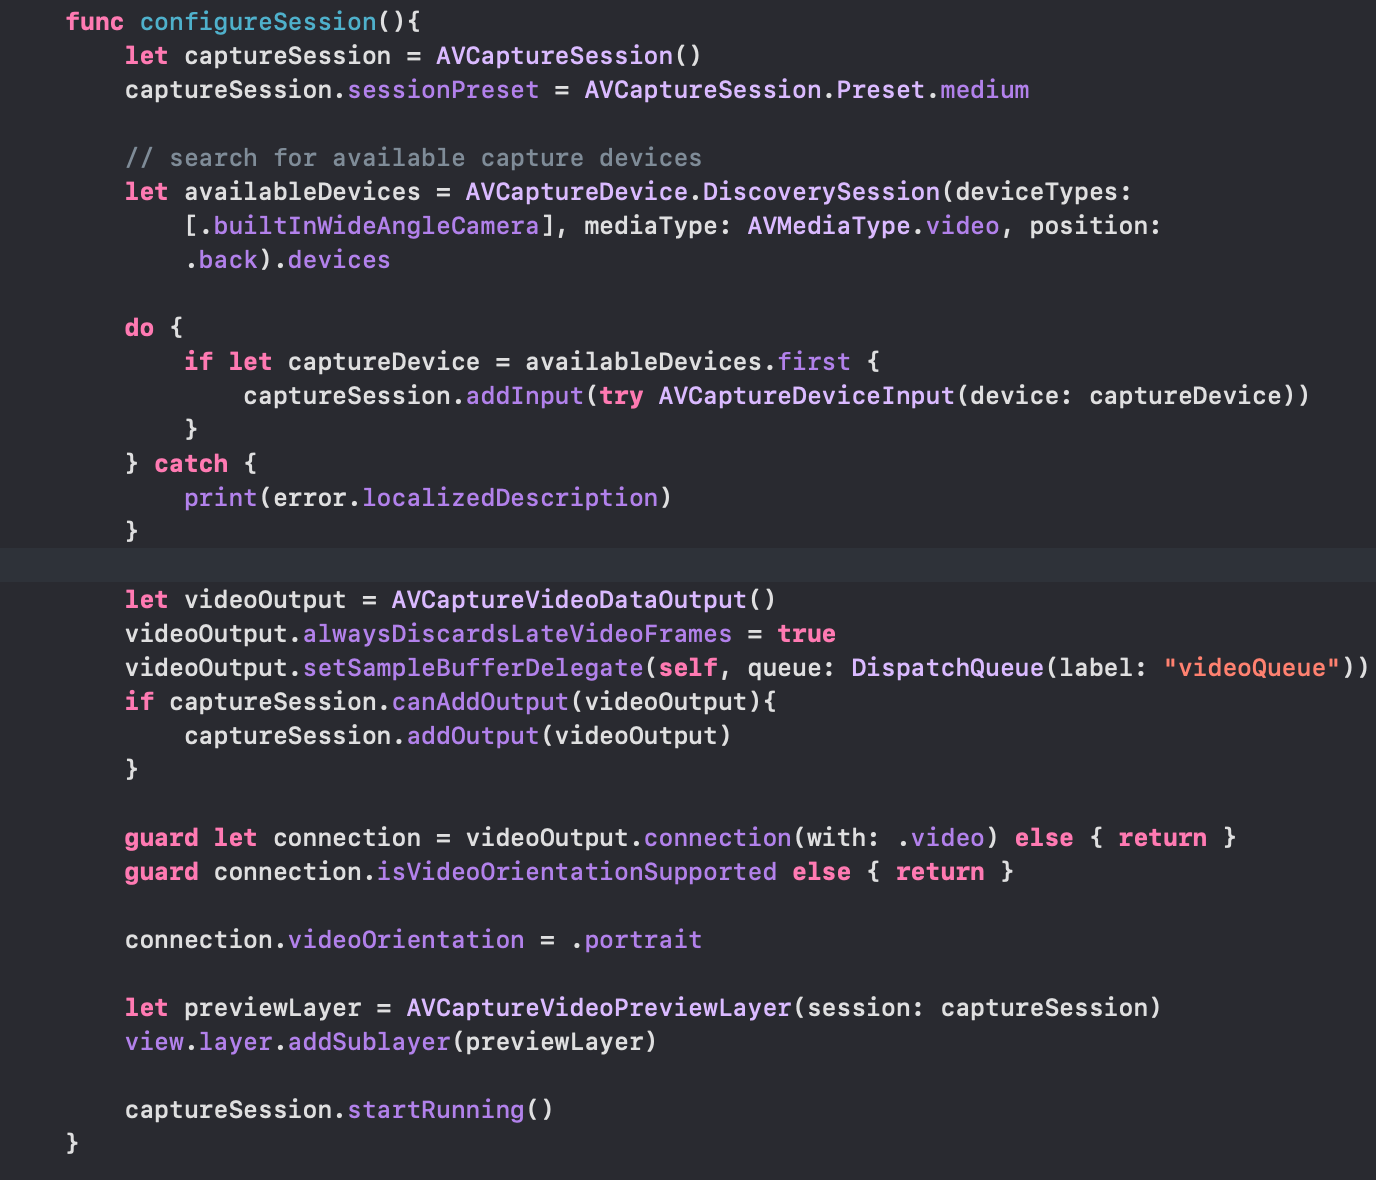
Now, to the machine studying half. We’ll use the Imaginative and prescient framework to maintain enter picture pre-processing for our model switch fashions.
By conforming our ViewController to the AVCaptureVideoDataOutputSampleBufferDelegate protocol, the next methodology can entry every body:
From the pattern buffer occasion above, we’ll retrieve a CVPixelBuffer occasion and move it on to the Imaginative and prescient request:
The VNCoreMLModel acts as a container, inside which we’ve instantiated our Core ML mannequin within the following manner:
StyleBlue.init(configuration: config).mannequin
config is an occasion of kind MLModelConfiguration. It’s used to outline the computeUnits property, which lets us set cpuOnly, cpuAndGpu, or all (neural engine) for operating on the specified system {hardware}.
let config = MLModelConfiguration()swap currentModelConfig {
case 1:
config.computeUnits = .cpuOnly
case 2:
config.computeUnits = .cpuAndGPU
default:
config.computeUnits = .all}
Notice: We’ve arrange a
UISegmentedControlUI management that lets us swap between every of the above mannequin configurations.
The VNCoreMLModel is handed contained in the VNCoreMLRequest request, which returns observations of the kind VNPixelBufferObservation.
VNPixelBufferObservation is a subclass of VNObservation that returns the picture output of the CVPixelBuffer.
Through the use of the next extension, we convert the CVPixelBuffer right into a UIImage and draw it on the display.
Phew! We’ve created our real-time model switch iOS utility.
Listed here are the outcomes when the appliance was operating on an iPhone SE:

Discover, how when operating on Neural Engine, model switch predictions occur in near real-time.
On account of gif dimension and high quality constraints, I’ve additionally created a video that reveals the real-time model switch demo in motion on CPU, GPU, and Neural Engine. It’s loads smoother than the above gif.
You could find the complete supply code of the above utility with the Core ML model switch fashions on this GitHub repository.
Core ML in iOS 14 launched mannequin encryption, so theoretically I might defend this mannequin. However within the spirit of studying, I’ve chosen to supply the above-created fashions without cost.
The way forward for machine studying is clearly no-code, with platforms corresponding to MakeML, and Apple’s Create ML main the way in which and offering easy-to-use instruments and platforms for rapidly coaching mobile-ready machine studying fashions.
Create ML additionally launched mannequin coaching help for human exercise classifications this yr. However I imagine model switch is the one which’ll be in a short time adopted by iOS builders. In case, you want to create a single mannequin encompassing a number of model photos, use Turi Create.
Now you can construct superb AI-based, Prisma-like functions with neural model switch neural networks at completely zero price(until you determine to add your apps to the App Retailer!).
Type switch can be used on ARKit objects to provide them a very completely different look. We’ll cowl that within the subsequent tutorial. Keep tuned.
That’s it for this one. Thanks for studying.
[ad_2]
Source_link