[ad_1]
Half 2 — Enterprise Logic

In at this time’s tutorial, we’re going to be constructing the Calculator’s enterprise logic in Swift utilizing the MVVM mannequin with the most effective practices in thoughts.
Constructing the view is roofed in half 1.
Furthermore, it’s completely high-quality to begin from right here in case you are not on constructing the views. Go forward and obtain the starter undertaking.
Our goal is to make a Calculator mannequin totally unbiased.
In line with the Single Accountability Precept, each module, class, or operate ought to have a single accountability.
A calculator performs calculations; so it ought to solely be centered on receiving inputs, computing, and returning the outcome. It’s not accountable on something view associated.
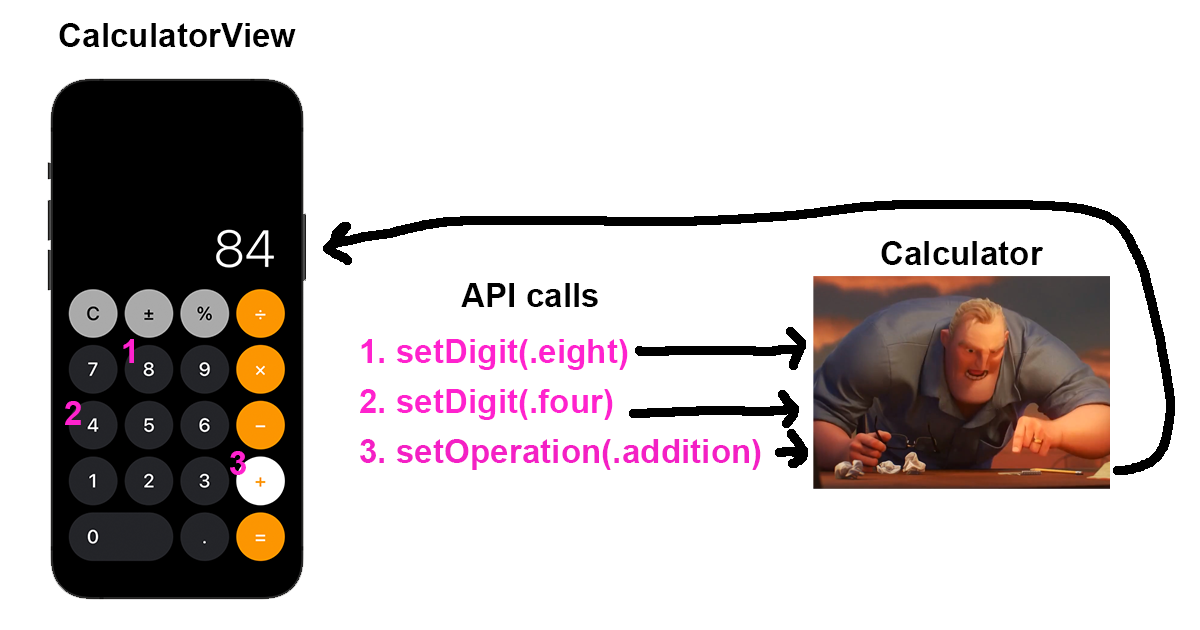
This offers us the flexibility to make use of the Calculator in something. We will use it in our already present CalculatorView, in unit assessments, in one other fully completely different calculator view, in a CLI, and many others.
To make this doable we have to declare an API. — what features and properties the exterior can entry to utilize our Calculator?
Let’s consider what properties and features are obligatory from the exterior to have the ability to totally function a calculator (These can be our public properties and features). — What’s at our disposal utilizing a actual calculator?
For properties, we’d like a approach to learn the presently displayed quantity.
For features, we have to carry out an motion for each ButtonType case.

Let’s begin.
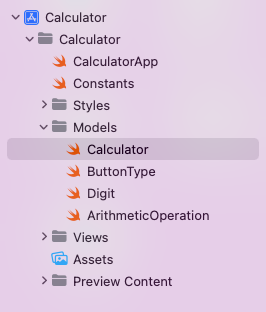
Inside Fashions, create a brand new Swift File named Calculator
Add the next boilerplate code:
Earlier than persevering with with the Calculator, let’s first join our view so we are able to begin testing it instantly.
Beneath CalculatorView.swift, create a brand new Swift File named CalculatorViewModel:
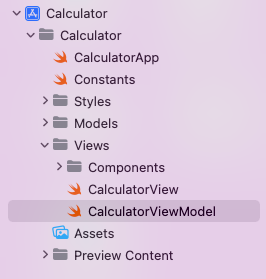
In CalculatorViewModel.swift, create a ultimate class identify ViewModel that conforms to the ObservableObject protocol and is inside our CalculatorView
Our ViewModel will embrace the buttonTypes order and an occasion of the Calculator mannequin. We’ll additionally want so as to add the mandatory properties and features to have the ability to function the Calculator.
Right here’s the code for CalculatorViewModel.swift:
In CalculatorView.swift, add a brand new @EnvironmentObject non-public property to reference our ViewModel.
Ensure to replace the displayText and buttonPad parts to get viewModel.displayText and viewModel.buttonTypes.
Right here’s the code:
Now, we have to notify the ViewModel when a calculator button is pressed.
In CalculatorButton.swift, add the ViewModel as an Atmosphere Object and add viewModel.performAction(for: buttonType) for the button’s motion
Lastly, in CalculatorApp.swift, create an occasion of the ViewModel as an environmentObject
Now our View and our ViewModel are totally linked! The View notifies the ViewModel a button was pressed, and the ViewModel updates the show textual content proven within the View.
We’ll now begin including the enterprise logic to make the Calculator work. We can be including every of our API features one after the other.
Set Digit
Return to Calculator.swift
Earlier than beginning with the logic of setting digits, we’re going to want these properties, so add them on the high:
On the backside, add the next helper features
When setting a digit, we have to:
- Test should you can add the digit (01 shouldn’t be doable).
- Convert
newNumberDecimal to a String - Append the
digitto the top of the string, convert the String again to Decimal and assign its new worth tonewNumber
Right here’s the code to set a digit:

Set Operation
We’ll have to create a brand new struct identify ArithmeticExpression to facilitate the analysis of arithmetic expressions.
Add this struct inside your Calculator mannequin:
Add expression and outcome properties and replace the quantity computed property
Now, for setting an operation we have to:
- Test if there’s a quantity we are able to use (
newNumberor earlieroutcome) and assign it to a brand new variablequantity - Test if there may be already an
existingExpression, if there may be, consider it utilizingquantityand assign the outcome toquantity - Assign new
ArithmeticExpressionwithquantityandoperationtoexpression - Reset
newNumber
Right here’s the code:
Now our Calculator works for digits and operations. Let’s simply add some extra visible queues to know if an operation is presently lively.
We’ll spotlight the operation button if the person simply pressed it.
Add the next helper operate to Calculator.swift
Add the next helper operate to CalculatorViewModel.swift
And eventually, add the next helper features to CalculatorButton.swift
In the identical file, replace the CalculatorButton button fashion’s foregroundColor and backgroundColor to get from the helper features simply added
We now have operation buttons highlighting!

Consider
This one is straightforward.
To guage we have to:
- Unwrap
newNumberandexpression(expression comprises the earlier quantity and operation) - Consider
expressionwithnewNumberand assign tooutcome - Reset
expressionandnewNumber
Right here’s the code:

Set %
To set p.c we have to:
- Test if
newNumberoroutcomeis presently used - Divide by 100 and assign the brand new worth
Right here’s the code:

Toggle Signal
toggleSign() is similar to setPercent(), as in we have to test if newNumber or outcome is presently used and apply an operation (add adverse signal on this case).
Nevertheless, there’s a tough half. — We can’t add a adverse signal to 0.
The answer?
We will add a adverse signal to a String, particularly the displayText. We simply have to know when and when to not insert the adverse signal.
Like in elementary math, we’re going to use carries (9 + 8 = 17, carry 1).
Add this property on the high, below non-public var outcome: Decimal?
non-public var carryingNegative: Bool = false
So, if newNumber or outcome exists, apply the adverse signal, in any other case, make the carryingNegative property true. (Will stay true till newNumber is ready)
Add this code to toggleSign()
The carryingNegative property is used within the helper operate getNumberString()
Bear in mind how when newNumber, expression.quantity, and outcome are nil, the default worth is 0? Because of the carryingNegative property, we are able to insert the adverse signal string to 0 to return “-0” displayText simply as a visible queue that the adverse signal is lively.
Replace getNumberString() with the next code:
Lastly, we have to deactivate the adverse carry when newNumber is ready.
Add this code to newNumber:
Set Decimal
Setting a decimal is perhaps the trickiest a part of all.
We’ll want so as to add the carry logic to 2 issues now. To the decimal level and the zeroes following the decimal level.
Our newNumber property is of kind Decimal. So there isn’t any such factor as a 5. or 15. , these are complete numbers. Nevertheless, if the person presses the decimal button, we have to present a visible queue that the decimal is being set. We have to replace the displayText till we are able to set newNumber to its respective decimal quantity. We’ll use a brand new property named carryingDecimal for this.
Let’s run a fast instance for inputting 5.2
- Set digit 5 (
newNumber = 5,carryingDecimal = false, and thedisplayText = “5”) - Set decimal (
newNumber = 5,carryingDecimal = true, and thedisplayText = “5.”) - Set digit 2 (
newNumber = 5.2,carryingDecimal = false, and thedisplayText = “5”)
Add carryingDecimal property
Add containsDecimal computed property
The precise setting decimal operate could be very easy:
- Test if
quantityalready comprises a decimal, if it does, return - Make the
carryingDecimalpropertytrue
Right here’s the code:
Lastly, reset carryingDecimal when newNumber is ready

Now, now we have the same downside to resolve. When setting zeroes after de decimal level, our newNumber property, being of Decimal kind, won’t ever add them. As for 5.40000 will all the time get transformed again to 5.4 as it isn’t a String.
Just like what we did with the decimal level, we have to create a brand new property named carryingZeroCount, to maintain observe of zeroes after the decimal level and append them when a non-zero digit is ready. Within the meantime, we may even present the zeroes within the displayText to offer a visible queue.
Let’s run it by an instance to make it clearer. We need to enter 2.003
- Set digit 2 (
newNumber = 2,carryingDecimal = false,carryingZeroCount = 0,displayText = “2”) - Set decimal(
newNumber = 2,carryingDecimal = true,carryingZeroCount = 0,displayText = “2.”) - Set digit 0 (
newNumber = 2,carryingDecimal = true,carryingZeroCount = 1,displayText = “2.0”) - Set digit 0 (
newNumber = 2,carryingDecimal = true,carryingZeroCount = 2,displayText = “2.00”) - Set digit 3 (
newNumber = 2.003,carryingDecimal = false,carryingZeroCount = 0,displayText = “2.003”)
I do know it’s getting considerably complicated, however by doing this, we are able to keep away from utilizing string manipulation for inputting altogether, which brings its fair proportion of points and complexities.
Add the carryingZeroCount property
Replace the setDigit() operate to:
And eventually, add carrying zeroes to getNumberString()
All Clear
Clearing all is straightforward. We simply have to reset all of our presently used properties
Right here’s the code:
Clear
Discover when utilizing the Apple Calculator, the AC (All Clear) button modifications to C (Clear) button proper after setting a digit or decimal? These buttons, would possibly appear to be they do the identical factor, resetting the show to 0, however in actuality, they’ve completely different functionalities.
All clear reset every little thing together with newNumber, expression, outcome, and carries.
Clear solely reset the final entry, in our case, newNumber and its carries.
So, let’s say you need to calculate 5 + 3. You enter 5 + 2 — Oops! Press clear button (5 + remains to be saved), enter 3, outcome = 8. All good.
Let’s get to it, however first, add pressedClear property, we’re going to want it.
Equally to our allClear() operate, add this code to clear()
And replace newNumber, in order that when its set, we reset pressedClear
Let’s add a small enchancment to quantity for a greater person expertise.
If the person simply pressed clear or decimal, let’s present a 0, even when there’s a outcome or expression lively.
Replace the quantity property with this code:
Now, to know which of the 2 clear buttons to point out in our view, we might want to create a computed property.
Add showAllClear computed property:
Return to CalculatorViewModel.swift and replace the buttonTypes computed property:


Closing Calculator
Right here’s the code of our ultimate Calculator mannequin:
We’re lastly completed constructing the Apple Calculator. Thanks for pulling by.
We efficiently encapsulated every element into its personal performance. The ViewModel isn’t liable for making the calculations, it simply informs the Calculator what the person is inputting and asks for the outcome.
The Calculator mannequin we created can be utilized with any view now. We will even create unit assessments with out involving another file.

You’ll find the supply code for this half right here.
Thanks for studying, I might actually respect it should you can comply with so I can hold creating extra content material like this 🙂
[ad_2]
Source_link