
[ad_1]

TL;DR
- Use
PlatformTextStylecompatibility API fromCompose 1.2.0 betato configureincludeFontPadding - For now,
includeFontPaddingis true by default in Compose however it is going to be modified to false within the subsequent releases of Compose, and ultimately the compatibility API might be eliminated. - Take a look at your UI utilizing
includeFontPaddingset tofalseand make any obligatory changes. - Use
LineHeightStyleAPI to match your designs simpler.
Creating Jetpack Compose, our new UI toolkit, from the bottom up gave us the prospect to re-evaluate decisions made prior to now. On this weblog put up, we’ll dive into the small print of textual content alignment in each the View system and in Compose. You’ll be taught extra in regards to the modifications we’re making to font padding which can make textual content rendering extra fault-proof and provide help to implement designs simpler from widespread designer instruments like Figma or Sketch.
Whereas migrating to the brand new APIs has loads of advantages it may additionally imply slight design inconsistencies, and/or breaking modifications in your automated screenshot testing. However to not fear! We are going to present you how one can begin utilizing these APIs and start testing your textual content right now, migrating on the tempo that’s most handy on your app.
includeFontPadding is a TextView parameter that successfully controls the road peak of the primary and final line in a textual content. Sometimes, turning it on will make the primary and final line taller by including vertical padding.
The default worth is true and you’ll override it as follows:
If we check out the next instance:
When includeFontPadding is false, the road peak of the primary and final line is the same as (descent — ascent).
When includeFontPadding is true is the place it will get attention-grabbing:
- Line peak of the primary line is the same as (descent — high).
- Line peak of the final line is the same as (backside — ascent).
- If there’s only one line, the road peak is the same as (backside — high).
- For interior traces, their line peak is all the time equal to (descent — ascent).
Prime, ascent, and descent are examples of font metrics. These metrics present details about a font that permits the system to evenly area and uniformly align traces of textual content. They’re fixed per font, and you’ll retrieve them through the use of the FontMetrics API or a instrument like ttx.
Setting includeFontPadding to true or false can impression how textual content is aligned in its mum or dad container, and result in refined variations in alignment.
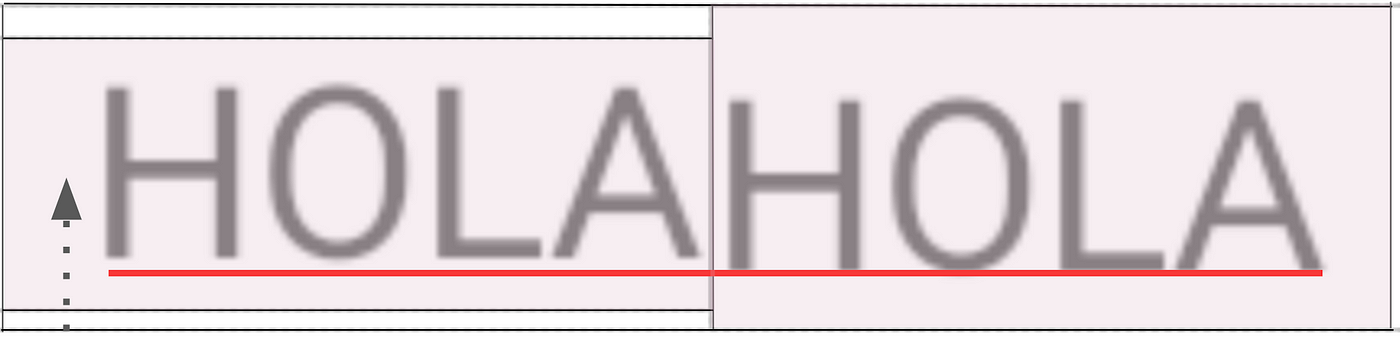
includeFontPadding is fake to the left and true to the appropriate.
It would sound like having includeFontPadding configured as true by default is likely to be the other of what you’d need. If that you must comply with particular design tips, having further padding in your textual content may make this tougher to attain. The reasoning behind together with this padding by default is historic.
Roboto is the usual typeface and the default font (or first font within the system font fallback) on the Android platform.
To calculate the utmost quantity of area obtainable to attract a font, the system, up till Android 27, made these calculations utilizing Roboto’s font metrics. It selected the quantity of obtainable area and regarded this area the “protected area to attract” the textual content.
This resolution didn’t work for all fonts, as fonts with designs or “scripts” which are usually taller than Latin textual content had been “clipped”. Clipping implies that a part of the glyphs (or characters) wouldn’t be solely seen on the obtainable draw area. All through this text we’ll use Burmese for example of a tall script. A pattern textual content in Burmese is ၇ဤဩဦနိ.
That is the place includeFontPadding was launched, to forestall tall scripts from getting clipped, permitting you so as to add a high and backside padding to the textual content.
We will see the conduct on this instance:
includeFontPadding is fake to the left (discover Burmese font clipping, and the white background colour resulting from no added padding) and includeFontPadding and true to the appropriate (Android API 25)So, when you’ve ever set includeFontPadding to false, and your app helps Burmese language, it’d face font clipping points relying in your Android model.
There are some legitimate use instances for setting includeFontPadding to false, for instance, to resolve vertical alignment points or to adjust to particular design specs.
Let’s see two examples:
When centering textual content in a mum or dad widget, for instance a button, textual content might be anticipated to be centered vertically.
The horizontal bar in H is anticipated to be vertically centered. Nonetheless, when includeFontPadding is true, this alignment would rely upon the font and its font metrics. Let’s see what occurs with a font that has extra padding on the high than on the backside:
On this instance, includeFontPadding is fake on the left and true on the appropriate. Discover the vertical alignment is barely off on the appropriate because of the uneven font padding. Relying on the font and the textual content used (as an example lowercase Latin textual content would naturally sit nearer to the decrease a part of the draw area), this distinction might be extra apparent.
One other instance is the place textual content must be aligned to the highest or backside of one other view, for instance a picture. Due to the additional padding added by includeFontPadding, the textual content and picture should not aligned. Let’s check out the specified design:

Normally to attain the above end result you’ll use a mixture of setting includeFontPadding to false plus hardcoding some padding.
The TextView widget is constructed on high of two foundational Java lessons, StaticLayout and BoringLayout, and delegates into one or the opposite relying on the character of the textual content to show on the display screen.
Beginning with gadgets operating Android 28 and above, we added useLineSpacingFromFallbacks performance to StaticLayout, so the ascent/descent of the textual content might be adjusted primarily based on the used font as a substitute of Roboto’s font metrics. When set to true, this configuration fixes the font clipping difficulty even when includeFontPadding is fake. And it prevents consecutive traces operating into one another which includeFontPadding wasn’t fixing.
Nonetheless this function wasn’t added to BoringLayout (textual content on a single line, left-to-right characters) at the moment. For this state of affairs, there may nonetheless be clipping. Help for this has been added lately, and can come out with Android T.
From API 33,
includeFontPaddingturns into redundant forTextViewfor the unique function it was designed, as a result of clipping points might be mechanically dealt with. Till your minSdk is 33, you continue to must setincludeFontPaddingtrue within the View system to forestall font clipping for tall scripts.
includeFontPadding is utilized in mixture with fallbackLineSpacing but in addition elegantTextHeight. The mix of those two parameters leads to advanced behaviors.
So as to add to the flexibleness (but in addition to the confusion), TextView additionally lets you configure firstBaselineToTopHeight and lastBaselineToBottomHeight which helps outline extra padding within the high and backside textual content line respectively. These attributes are solely utilized in API degree 28 and better.
A number of parameters help you modify font padding in a
TextView, they will work together in advanced methods, and conduct would possibly range between API ranges. At all times make certain to check your View-based UI in opposition to varied API ranges.
When constructing the preliminary Textual content implementation in Compose, the conduct was aligned with TextView’s conduct, including font padding by default in Compose’s TextLayout.
Nonetheless, it didn’t expose a parameter to show this padding on and off.
The neighborhood was very fast to level this out, by making a bug associated to View parity which earned a number of consideration. The request was to permit turning includeFontPadding on and off when utilizing the Textual content composable operate, like within the View system.
Whereas considering find out how to implement this toggle function in Compose, we analyzed how includeFontPadding is used and the principle use instances it was fixing. We knew that textual content ought to simply render as anticipated and that includeFontPadding is a really Android particular configuration and shouldn’t be on the widespread API. It’s a complicated parameter total and really error susceptible (it exposes an API that’s exhausting to know, exhausting to elucidate, and works just for a subset of particular instances).
We had the next targets:
- Eradicating pointless paddings, giving the management again to you to implement the paddings you actually need.
- Robotically stopping clipping points for tall scripts, italic fonts, and so on.
So we launched modifications that included:
- Creating a brand new API
PlatformTextStyleto permit to changeincludeFontPaddingon and off (default worth is true). - To repair all tall fonts clipping points that would occur from turning
includeFontPaddingoff in Compose, we apply extra padding when required for less than the primary and final line, and the max line peak is calculated primarily based on the font(s) that’s used for all of the textual content included in a given line (as a substitute of theFontMetricsof the primary font within the font fallback). - We’ve utilized an answer that works for all variations of Android till API 21.
In case you’re serious about taking a better have a look at the implementation of our resolution, take a look at the next change lists:
first change, including extra padding mechanically
with this modification we added momentary compatibility configuration forincludeFontPaddingin TextStyle/ParagraphStyle
comply with up change, holdingincludeFontPaddingtrue by default in Compose
As a part of Compose 1.2.0-alpha07, we uncovered an API in TextStyle/PlatformTextStyle that lets you toggle includeFontPadding on and off. The default worth is true, that means font padding is added.
The API is marked as experimental/deprecated and is just for compatibility functions. As you configure your texts with includeFontPadding switched to false and regulate your layouts if required, we intend to vary includeFontPadding default worth to false in upcoming releases of Compose, and ultimately take away the compatibility API.
You possibly can configure this in every Textual content particularly, so the migration is progressive:
Or extra generically in your typography:
As these APIs are experimental, you’ll must annotate the usages with ExperimentalTextApi annotation.
Alternatively, when you’re constructing with Gradle, you may add the next exception to the kotlinOptions in your app’s construct.gradle file:
kotlinOptions {
...
freeCompilerArgs += ["-Xuse-experimental=androidx.compose.ui.text.ExperimentalTextApi"]
}
As we hold evaluating the impression of our modifications, we listened to neighborhood’s suggestions and developed an API that will help you match your designs simpler for textual content in your Compose app.
In 2019 Figma, a designer instrument, introduced that they made modifications to how they measure and apply line peak. Briefly, Figma distributed the road peak identical to the net normally does: 50/50 on high and backside. Many designers and builders have been chatting to us about this weblog put up since.
In March 2022, a developer posted an article on find out how to have Figma conduct in Compose, because it doesn’t work out of the field.
LineHeight is just not a brand new idea for Compose Textual content, nonetheless there’s extra we are able to do to make displaying textual content simpler and canopy for many use instances offered by these completely different design instruments.
Contemplating this background plus the modifications we had been already making, we dedicated to the next targets:
- Line peak might be utilized even for single line textual content
- Present a technique to have a good distribution of line peak between above baseline and beneath baseline (like textual content in Figma)
- Present a technique to have extra line peak to above baseline or beneath baseline (a use case akin to how line peak works in textual content in Google Docs)
- Present a method for the developer to allow or disable the addition of line peak on the high and backside of the textual content
We created a extra versatile API that lets you customise line peak conduct, providing you with extra management over the displayed textual content.
With the modifications on this changelist, we added LineHeightStyle (beforehand named LineHeightBehavior) to the present TextStyle and ParagraphStyle.
LineHeightStyle controls whether or not line peak is utilized to the highest of the primary line and to the underside of the final line. It additionally defines the alignment of traces within the area supplied by TextStyle(lineHeight). It’s a brand new API that gives a number of choices to have the ability to modify your textual content’s conduct throughout the obtainable draw area.
You possibly can configure LineHeightStyle as follows:
Be aware: We suggest defining TextStyle through the use of the LocalTextStyle merger, as a result of failing to do will make you lose your Materials theme’s types. You possibly can examine the dialogue round this on this function request.
LineHeightStyle.Alignment defines find out how to align the road within the area supplied by the road peak. Let’s see an instance utilizing LineHeightStyle.Alignment.Prime vs LineHeightStyle.Alignment.Backside:
Alternatively, LineHeightStyle.Trim choices will help you take away or hold further padding from the highest of the primary line and the underside of the final line. For instance, that is what the textual content would appear to be with LineHeightStyle.Trim configured as None vs Each:
Be aware: The configuration is utilized solely when a line peak is outlined on the textual content.trim function is out there solely when PlatformParagraphStyle.includeFontPadding is fake.
includeFontPadding along with lineHeight and LineHeightStyle (Alignment and Trim configurations) lead to a number of combos that help you higher align and magnificence your Textual content in any given font. Be sure to take a look at the documentation for the related lessons we launched above, to discover the choices that provide help to finest match your designs.
Compose 1.2.0 beta is out, and the Compose equal to includeFontPadding is enabled by default with the chance to show it off, and begin adjusting and testing your Textual content right now.
Whereas the PlatformTextStyle compatibility API (which lets you disable includeFontPadding) will stay obtainable in future releases, we purpose to vary the default conduct to being off by default quickly. You can begin utilizing it to check your screens and make all obligatory changes if they’re required.
Moreover we’ve added the LineHeightStyle API with a number of choices, one other extremely requested function, that can provide help to match your designs simpler.
In case you expertise points/bugs whereas turning includeFontPadding off, please tell us and file a bug on our difficulty tracker.
Any additional questions? Drop a remark beneath or attain out to me on Twitter, we’d love to listen to from you!
Comfortable composing! 👋
This put up was written with the collaboration of Seigo Nonaka, Sean McQuillan, Siyamed Sinir and Anastasia Soboleva on the Jetpack Compose Textual content workforce. Particular due to Jolanda Verhoef and Florina Muntenescu on the DevRel workforce for his or her concepts and evaluate.
[ad_2]
Source_link