[ad_1]
3D contact is the power to trace person’s contact stress stage and, for my part, is without doubt one of the most attention-grabbing and unexploited function of iOS contact dealing with system.
With this tutorial we’re going to construct a customized button that leverages on 3D contact to ask person to verify button motion and, if 3D contact shouldn’t be out there on person system, it simply fallback to a special behaviour. Here’s a fast video to point out you ways this management works:
1. When person’s contact begins, a round progress bar retains monitor of person contact stress. The circle will likely be crammed in relation to person stress, the more durable the button is pressed the extra the circle is crammed (I’ll present you later methods to we simulate this behaviour on gadgets that don’t assist 3D contact).
2. When the circle is totally crammed, it turns into an lively button, label adjustments to “OK” and shade to inexperienced, indicating that the motion could be confirmed. Now person can simply swipe up and launch his finger over the circle to verify the motion.
On the whole you ask person to verify a delete-action utilizing a pop up. I actually like to experiment with UX interactions, and for my part this management can simply substitute the “normal” stream. It’s best to do that behaviour on a bodily system to grasp how simple it’s to work together with this management 🙂
Let’s code
As first, should you don’t understand how customized controls work I strongly encourage you to learn my earlier article about constructing customized controls and obtain the tutorial mission to simply comply with the following steps.
Drawing the UI
The code to attract the circle and the label displayed when person begins interacting with the button is simple, let’s verify it:
    non-public let circle = CAShapeLayer()
    non-public let msgLabel = CATextLayer()
    non-public let container = CALayer()
    .
    .
    .

    non-public func drawControl(){

        // Circle
        var rework = CGAffineTransform.id
        circle.body = CGRect(x: 0, y: 0, width: measurement.width, peak: measurement.peak)
        circle.path = CGPath(ellipseIn: CGRect(x: 0,y: 0,width: measurement.width, peak: measurement.peak),
                             rework: &rework)

        circle.strokeColor = UIColor.white.cgColor
        circle.fillColor = UIColor.clear.cgColor
        circle.lineWidth = 1
        circle.lineCap = kCALineCapRound
        circle.strokeEnd = 0 // initially set to 0
        circle.shadowColor = UIColor.white.cgColor
        circle.shadowRadius = 2.0
        circle.shadowOpacity = 1.0
        circle.shadowOffset = CGSize.zero
        circle.contentsScale = UIScreen.predominant.scale

        // Label
        msgLabel.font = UIFont.systemFont(ofSize: 3.0)
        msgLabel.fontSize = 12
        msgLabel.foregroundColor = UIColor.white.cgColor
        msgLabel.string = ""
        msgLabel.alignmentMode = "heart"
        msgLabel.body = CGRect(x: 0, y: (measurement.peak / 2) - 8.0, width: measurement.width, peak: 12)
        msgLabel.contentsScale = UIScreen.predominant.scale

        // Put all of it collectively
        container.body = CGRect(x: 0, y: 0, width: measurement.width, peak: measurement.peak)
        container.addSublayer(msgLabel)
        container.addSublayer(circle)

        layer.addSublayer(container)
    }
The circle and msgLabel layers are initialized and hooked up to the container layer.
There may be nothing particular to spotlight on this code, simply be aware that the strokeEnd property of circle is about to 0.
This property is admittedly helpful to simply get hold of good animation on a form layer. Briefly, the trail that describes the form layer attracts its stroke between strokeStart and strokeEnd, the default worth for these properties are 0 and 1, so taking part in with this vary you possibly can simply get nifty drawing animations. For this management we set strokeEnd to 0 and we animate it reflecting person contact stress.
Management States
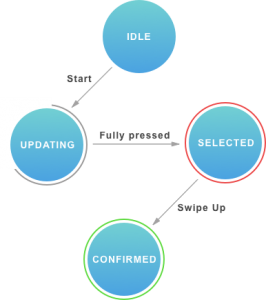
This controller defines its UI and behavior with a easy state machine described by the ConfirmActionButtonState enum.
enum ConfirmActionButtonState {
    case idle
    case updating
    case chosen
    case confirmed
}
When no motion is taken on the management, the state is idle. When person interplay begins the state adjustments to updating. When the circle is totally crammed the state is chosen and if customers has already moved is finger contained in the inexperienced circle the state is confirmed.
When person raise his finger, if the management state is the same as confirmed, we lastly propagate the button motion, since we will thought-about it as confirmed, in any other case the state will simply strikes again to idle

Dealing with person contact
We override beginTracking, continueTracking and endTracking strategies to simply reply to person touches and seize all the knowledge for the management.
Inside these strategies we’ve got to trace 3 parts:
1. The contact location. Helpful to outline the place to attract the container layer (the one which comprises the circle and the message label).
2. The contact drive worth. Wanted to animate the circle and perceive wether to set the management state to updating or to chosen and confirmed.
3. The up to date contact location. We have to monitor contact place to confirm whether it is contained into the container layer bounds and, in that case, set state to confirmed or updating.
Let’s see the code for the beginTracking technique.
    override func beginTracking(_ contact: UITouch, with occasion: UIEvent?) -> Bool {
        tremendous.beginTracking(contact, with: occasion)

        if traitCollection.forceTouchCapability != UIForceTouchCapability.out there{
  // fallback code ….
        }

        let initialLocation = contact.location(in: self)

        CATransaction.start()
        CATransaction.setDisableActions(true)
        container.place = initialLocation ++ CGPoint(x: 0, y: -size.peak)
        CATransaction.commit()

        return true
    }
We verify for system contact drive capabilities and if the {hardware} doesn’t assist this function we execute a fallback code (we’ll discuss fallback behaviour later) . Then the contact location is used to outline the container layer place, subtracting the management peak. The ++ operand is outlined on the finish of the file to allow sum of CGPoint parts.
To keep away from implicit system animations, the container place is assigned after the setDisableActions name (extra details about this method right here [CALayer: CATransaction in Depth](http://calayer.com/core-animation/2016/05/17/catransaction-in-depth.html#preventing-animations-from-occurring) )
From the continueTracking operate we carry out all of the wanted operation to confirm the management state.
    override func continueTracking(_ contact: UITouch, with occasion: UIEvent?) -> Bool {
        tremendous.continueTracking(contact, with: occasion)
        lastTouchPosition = contact
        updateSelection(with:contact)

        return true
    }
The lastTouchPosition will likely be used later to assist older gadgets that doesn’t have 3D contact functionality. Whereas the updateSelection technique receives the up to date contact.
Right here is the code for updateSelection:
    non-public func updateSelection(with contact: UITouch) {

        if self.traitCollection.forceTouchCapability == UIForceTouchCapability.out there{
            intention = 1.0 * (min(contact.drive, 3.0) / min(contact.maximumPossibleForce, 3.0))
        }

        if intention > 0.97 {
            if container.body.comprises(contact.location(in:self)){
                selectionState = .confirmed
            }else{
                selectionState = .chosen
            }
            updateUI(with: 1.0)
        }
        else{
            if !container.body.comprises(contact.location(in:self)){
                selectionState = .updating
                updateUI(with: intention)
            }
        }
    }
Once more, we verify for drive availability first and, if the function is supported, we calculate the present “person intention”. The intention property could be assigned with a price that goes from 0 (when no touches are noticed) to 1 (when contact reaches the utmost wanted drive). The operation to acquire this worth is very simple: we simply divide the present contact drive by the utmost drive, normalizing the worth to a variety legitimate for the “intention” property. Making an attempt this code on an actual system I discovered that person has to press with to a lot drive to succeed in the utmost worth, because of this I’ve added a cap of three.0 to scale back the wanted contact stress.
(Truly I’m not so positive the title “intention” is an effective selection… native audio system please, let me know if the title is obvious sufficient to explain the property position :P).
Now that the intention worth has been calculated for this contact cycle, we will replace management state and UI. If the worth is bigger then 0.97 and person contact has already moved contained in the inexperienced circle, the management state is confirmed, in any other case, if person remains to be urgent the “delete” button, the present state is about tochosen. When the worth is lower than 0.97 we are saying the management is simply updating.
The updateUI operate takes the present intention worth and passes it to the endStroke property of the circle layer. Some other UI customization associated to the “intention” may very well be outlined inside this technique.
    non-public func updateUI(with worth:CGFloat){
        circle.strokeEnd = worth
    }
Lastly, we override the endTracking technique to set off the valueChanged occasion if the present management state is the same as confirmed.
    override func endTracking(_ contact: UITouch?, with occasion: UIEvent?) {
        tremendous.endTracking(contact, with: occasion)
        intention = 0

        if selectionState == .confirmed{
            self.sendActions(for: UIControlEvents.valueChanged)
        }else{
            selectionState = .idle
            circle.strokeEnd = 0
        }
    }
Should you verify the Predominant.storyboard file you will notice that the valueChanged motion for the “delete” button has been assigned to the confirmDelete technique of ViewController and, clearly, the customized class worth for the delete button has bee set to ConfirmActionButton.
Management state and UI
The management UI is up to date in relation to the present management state. To simplify this behaviour the code to replace UI has been positioned immediately contained in the didSet observer for the selectionState property.
The code is simple, simply change circle Coloration and label message relying on the brand new state and name setNeedsLayout on circle to drive its structure to be redrawn.
    non-public var selectionState:ConfirmActionButtonState = .idle {
        didSet{
            swap self.selectionState {
            case .idle, .updating:
                if oldValue != .updating || oldValue != .idle {
                    circle.strokeColor = UIColor.white.cgColor
                    circle.shadowColor = UIColor.white.cgColor
                    circle.rework = CATransform3DIdentity
                    msgLabel.string = ""
                }

            case .chosen:
                if oldValue != .chosen{
                    circle.strokeColor = UIColor.crimson.cgColor
                    circle.shadowColor = UIColor.crimson.cgColor
                    circle.rework = CATransform3DMakeScale(1.1, 1.1, 1)
                    msgLabel.string = "CONFIRM"
                }

            case .confirmed:
                if oldValue != .confirmed{
                    circle.strokeColor = UIColor.inexperienced.cgColor
                    circle.shadowColor = UIColor.inexperienced.cgColor
                    circle.rework = CATransform3DMakeScale(1.3, 1.3, 1)
                    msgLabel.string = "OK"
                }
            }
            circle.setNeedsLayout()
        }
    }
Fallback code
Only a fast be aware in regards to the fallback for gadgets that don’t assist 3D contact. I actually wished to maintain the identical design for all of the gadgets so I made a decision to setup the intention property with a timed up to date, counting on time as an alternative of contact drive. All of the logics are equivalent to what we’ve got beforehand mentioned, however the intention property is up to date mechanically every 0.1 second when person is urgent the delete button. Right here is the code for the beginTracking operate the place the timer is outlined:
        if traitCollection.forceTouchCapability != UIForceTouchCapability.out there{
            timer = Timer.scheduledTimer(timeInterval: 0.1,
                                         goal: self,
                                         selector: #selector(ConfirmActionButton.updateTimedIntention),
                                         userInfo: nil,
                                         repeats: true)
            timer?.fireplace()
        }
the updateTimedIntention is accountable to replace the intention worth to succeed in completion (1.0) after 2 seconds:
    func updateTimedIntention(){
        intention += CGFloat(0.1 / 2.0)
        updateSelection(with: lastTouchPosition)
    }
Conclusions
I actually loved scripting this code and I feel I’m going to speak about different customized controls quickly. For my part nonetheless there’s a number of area to experiment on customized UI and enhance person expertise leveraging on new gadgets function… I hope this tutorial would possibly encourage you 🙂
[ad_2]
Source_link