[ad_1]
After some months utilizing VIPER for my apps, I began working alone structure: I wished to create one thing higher for my very own wants. I then began sharing ideas with my colleague Marco. He’s on the Android aspect of issues, however we would have liked to debate to search out frequent floor and each get to a constant end result.
We “form of” failed and ended up with one thing actually much like VIPER, however! This revisited model of VIPER is what I’m at present utilizing in my functions, so I wouldn’t contemplate it a failed try. Extra like a customized model of VIPER.
Alongside this path I discovered so many issues about architectures that I made a decision to share the expertise with a sequence of articles. There are two issues I’d wish to deal with:
• the choices taken to get to an entire structure, highlighting rationale and doubts (a few of that are nonetheless there)
• the structure I ended up with, exhibiting code and a few sensible examples.
Any longer let’s name this construction VIPER-S. The S right here stands for Semantic, since I attempted to acquire a clearer technique to identify issues, giving extra significance to roles and communication, and including some guidelines that enhance code readability and writing.
Right here you may obtain the ultimate code of VIPER-S.
LET’S ARCHITECT
Let’s begin this journey with a query. Why do we’d like an structure? This query has many alternative solutions however probably the most related are:
• to have a transparent understanding of our code (and simplify its upkeep)
• To simply distribute obligations (and simplify staff working)
• to enhance testability (and simplify your life)
With these solutions in thoughts, and moved by a profound sense of goal, we are able to begin planning our structure.
I’m an enormous fan of “divide-et-impera”: to me it’s a lifestyle. That’s why I’d begin by figuring out all of the domains and roles, the actors which might be going to work on these domains and the way these actors talk with one another. These parts are going to outline the pillars of our structure so it’s actually essential to have a transparent understanding of what they’re.
A website is an enormous set that accommodates all of the logic for an space of duty. A task is a bit a part of this set, which is extra particular and identifies a exact want. An actor is a code ingredient that implements all of the features to fulfill a job.
Let’s checklist and describe the domains and roles that I’ve recognized to construct VIPER-S.
ARCHITECTURE DOMAINS: USER INTERFACE
With the Consumer Interface area we present info to the customers and we work together with them. Let’s see the roles for this area.
ROLE: DISPLAY UI INFORMATION
That is a extremely “dumb” position. The information reaching this area is able to use and there’s no have to work on it any additional. It solely must be despatched right down to the ultimate UI parts, with features like this:
func show (date:String){
    label.textual content = date
}
As you may see, the date property has most likely been transformed from Date to String in a earlier step. We solely show the ready-to-use info right here. A label shows a String, so we anticipate to obtain a String.
ROLE: HANDLE UI EVENTS
That is one other not-too-pro-active position, in actual fact we solely intercept consumer interactions or software lifetime occasions right here. The actor answerable for this position is mostly known as inside a UI target-action:
@IBAction func save(){
    eventsHandler.onSave()
}
ARCHITECTURE DOMAINS: DATA
The Knowledge area is the place we get hold of info from a supply and we rework it to be offered later, or, alternatively, the place we course of a consumer motion into one thing that may be saved someplace or used one way or the other. Listed here are the roles for the Knowledge area.
ROLE: MANAGE DATA
Let’s think about this position as a set of a number of staff which might be accountable of dealing with particular jobs. They solely know the best way to get their jobs performed and so they notify another person once they have accomplished or failed an operation.
Right here is a straightforward (unsafe) instance of a operate for this position:
func fetchItems() {
    networkManager.get(at: itemsPath){
        (accomplished, gadgets) in
        if (accomplished){
            presenter.current(gadgets: gadgets)
        } else {
            presenter.presentItemFetchError()
        }
    }
}
A employee is fetching gadgets utilizing a community supervisor. It is aware of precisely the best way to use the supervisor, however it doesn’t work with any worth coming from the community, it simply passes the worth to an object that in flip is aware of the best way to current it.
ROLE: PRESENT DATA
Let’s remind ourselves to not confuse presenting with displaying: once we current the knowledge we rework it into one thing that shall be displayed via the UI later. The thing that implements this position, is commonly known as from the Handle Knowledge position. Returning to the earlier instance for the consumer interface, we aren’t setting the textual content worth of the label right here. As a substitute, we’re remodeling a Date right into a readable String.
func current(date:Date){
    let dateString = date.localizedString(“YYYY-mm-dd”)
    ui.show(date:dateString)
}
ARCHITECTURE DOMAIN: NAVIGATION
This area has a single position: dealing with the navigation for the App. The logic behind the best way to show the “subsequent view” is completely dealt with inside this position and the identical is true for its initialization and dismissal. We then want to make use of UIKit to work with Storyboards and name all of the wanted default iOS navigation features.
func navigateToDetail(‘for’ merchandise:Merchandise) {
    let itemDetail = ItemDetailNavigator.makeModule(with: merchandise)
        push(nextViewController: itemDetail)
}
On this instance the navigator is constructing the module (extra on this time period later — simply take a look at it as a ViewController for now) that we’re going to current and it pushes it to the present navigation stack.
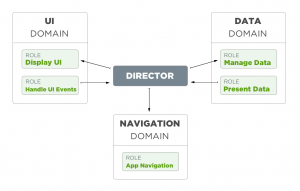
COMMUNICATION BETWEEN DOMAINS
Let’s now introduce the “director”, the primary actor for the structure. We’re going to see its code intimately later. For now let’s simply speak about it as the best way to construct a bridge between the domains we simply noticed.
The director is accountable of driving the stream of data from UI occasions to knowledge dealing with and from knowledge dealing with again to the UI. Additionally it is accountable of defining when navigation has to happen. Every operation begins from the director and every results of the operation, in some unspecified time in the future, passes via it.
Let’s verify the overview of the structure mentioned to this point to higher perceive how communication occurs:

All these arrows… however belief me, the stream is simpler than it appears to be like. Here’s a real-life instance: when a consumer faucets the save button, the appliance has to avoid wasting info and show a dialog with a hit message (or an error in case one thing goes flawed).
The stream will begin from the left of the earlier picture from “deal with occasions”. The consumer faucet is intercepted and handed to the director. The director sends the knowledge to the item answerable for the position “handle knowledge”. When this object completes the operation it’s able to current the end result to the director which, at this level, is sending the knowledge again to the UI area which in flip is aware of the best way to show it. Now let’s say that on the finish of the saving operation, as a substitute of presenting a popup we’d fairly go to a different web page. Simple. The director, as a substitute of transferring the stream to the UI area, can simply drive it to the Navigation.
LET’S CODE
It’s now lastly time to translate the structure logic into code!
Earlier than beginning this course of we have to determine the required modules for the instance we’re going to implement. What’s a module, although? The structure considers a module what we are able to merely name a “Web page” or a “View” of the appliance. Which means for an software the place you may checklist, show and add gadgets you’ve 3 modules. With the MVC structure, for example, every module could be a view controller.
Let’s introduce the instance of code that we are going to implement with these tutorials. We’re writing an software to deal with generic “Objects” that may be enabled or disabled. An Merchandise has a reputation, a creation date and a state (enabled or disabled). We’re going to implement 3 modules to deal with gadgets: “Objects Record”, “Add Merchandise” and “Merchandise Element”. Including to the above the welcome pages, we’ve got a complete of 4 modules divided in 2 teams: Objects and Normal.
ORGANIZE YOUR PROJECT
I’m a messy man, so I want a strict schema to observe after I’m engaged on an enormous mission. For VIPER-S I made a decision to have a very clear folder construction. That is a part of defining the structure, in spite of everything.
Every module group has a root folder. On this case “Normal” and “Objects” (I’d fairly create actual folders for the module teams, not simply the Xcode mission folders). Every module has its personal folder. For Objects we’ve got “Add”, “Record” and “Element” and for “Normal” simply “Welcome”.
That is the present folder construction for the mission:

Every file and sophistication follows a easy naming conference: prefixed utilizing the folder construction that accommodates it, after which named after its specialization. For instance, the director of the Record module for Objects known as “ItemsListDirector.swift” and the category identify is “ItemsListDirector”. This shall be actually helpful when used with autocomplete. While you begin writing “Record…” you’ll get all of the lessons for this group. Then “…Add” to get solely lessons for ListAdd module. It’s a extremely useful conference! 🙂
We’ll focus on different naming conventions later. That is only a easy rule that creates a shared logic for identify definition and mission group. It’s a life-saver if you happen to, like me, are usually not actually good at maintaining your naming model unchanged over the course of very lengthy tasks.
THE CONTRACT AND PROTOCOLS DEFINITION
Let’s start by writing a contract that describes the structure for every module via protocols. A contract is the a part of the structure the place you may outline exactly what a module does. It’s a type of documentation for the module.
We’ll begin from the “Objects Record” module, translating the roles beforehand described into protocols. For this module we all know that it exhibits the checklist of “gadgets” via a desk and it has a “delete all” button to flush all of the accessible gadgets.
The “Show UI” position has to show gadgets, errors and success messages. protocol to explain this position could be:
protocol ItemList_DisplayUI {
    func show(gadgets: [ItemUI])
    func show(error:String)
    func displaySuccess()
}
The itemUI is a base object outlined by easy sorts like String, UIImage or Bool. We’ll focus on it later.
All of the features that replace UI parts with a UI mannequin are prefixed with the “show” phrase. Being actually strict within the naming conference is essential, as a result of I don’t wish to have doubts like “ought to I name this operate ‘present’, ‘show’, ‘replace’ WAT?!”. All of the protocols have a predefined set of verbs/key phrases to make use of.
Notice: right here is one other little naming conference that I’m utilizing. Contemplating we’ll find yourself with a substantial variety of information and lessons for a single module, I discovered it helpful to distinguish protocols from lessons. That’s why I’m placing an underscore between the module identify and the position identify, acquiring the protocol identify (ItemList_DisplayUI). Belief me, you’ll love this little trick later, whenever you write your personal code and also you wish to autocomplete a category or a protocol identify rapidly.
The “Deal with UI occasions” position has 3 features: it has to say when the UI is prepared (i.e. when viewDidLoad known as), it has to set off an occasion when the consumer faucets the “Delete All” button, and one other occasion when an merchandise is chosen from the desk.
protocol ItemsList_HandleUIEvents {
    func onUIReady()
    func onDeleteAll()
    func onItemSelected(index:Int)
}
Usually, the features for this position begin with the prefix “on” adopted by the identify of the dealt with occasion.
Let’s transfer on to the Knowledge area. The primary position is “Handle Knowledge” and it has 2 features: fetch the gadgets and delete all of the gadgets.
protocol ItemsList_ManageData{
    func fetchItems()
    func deleteAllItems()
}
The second position is “Current Knowledge”. With this position we wish to current gadgets when accessible and we may additionally current generic success or error messages.
protocol ItemsList_PresentData{
    func current(gadgets:[Item])
    func presentSuccess()
    func presentError()
}
Personally I really like this notation and and I discover it extraordinarily readable. The verb “current” is prefix to all of the protocol features.
The Navigation area’s solely position is “Navigate”. From the ItemsList module we all know that we are able to choose an merchandise and see its element in a dedicate view. We are able to additionally return to the Welcome view, or extra generically, we are able to simply return to the earlier view.
protocol ItemsList_Navigate{
    func gotoDetail(‘for’ merchandise:Merchandise)
        func goBack()
}
Capabilities for the navigate protocol are prefixed with “go/goto”.
protocol ItemsList_Navigate{
    func gotoDetail(`for` merchandise:Merchandise)
    func goBack()
}
That is the total code of the ItemsListProtocol.swift file. As you may see, if every position’s performance you may simply perceive what this module does:
protocol ItemList_DisplayUI {
    func show(gadgets: [ItemUIModel])
    func displayError()
    func displaySuccess()
}

protocol ItemsList_HandleUIEvents {
    func onUIReady()
    func onDeleteAll()
    func onItemSelected(index: Int)
}

protocol ItemsList_ManageData{
    func fetchItems()
    func deleteAllItems()
}

protocol ItemsList_PresentData{
    func current(gadgets:[Item])
    func presentSuccess()
    func presentError()
}

protocol ItemsList_Navigate{
    func gotoDetail(`for` merchandise:Merchandise)
    func goBack()
}
This concludes half one of many sequence. Within the coming elements we’ll dive deeper into the structure’s code, writing all of the actors concerned. We’ll full the ItemList module and we’ll speak about the best way to deal with some particular patterns like passing info to a different module (i.e. when you choose an Merchandise and also you navigate to the element web page) and getting info from one other module (i.e. whenever you add a brand new Merchandise within the ItemsAdd module and you must notify the ItemsList module to refresh the checklist).
Thanks for studying this far and keep tuned for the subsequent installments within the sequence. Ciao!
[ad_2]
Source_link