
[ad_1]
JavaScript has lengthy dominated client-side net programming, however might a brand new Python framework shake issues up? Sure. Throughout PyCon US 2022, Anaconda’s CEO introduced a brand new expertise known as PyScript that enables customers to put in writing Python code within the browser.
We solely want to put in writing and run Python code in HTML to construct net functions. Because of this we don’t want to fret about deployment, however every part will occur in our net browser.
One of many coolest and best issues you’ll be able to construct in your net browser is Python visualizations.
This text will present methods to show matplotlib visualizations in your net browser utilizing PyScript.
Add PyScript to an HTML template
To arrange PyScript, we’d like first a primary HTML template. Most textual content editors and IDEs have an HTML template you’ll be able to work with. You solely must create an HTML file, then sort both doc or HTML and hit enter.
<html>
<head>
<meta charset=”UTF-8″>
<meta identify=”viewport”
content material=”width=device-width, user-scalable=no, initial-scale=1.0, maximum-scale=1.0, minimum-scale=1.0″>
<meta http-equiv=”X-UA-Appropriate” content material=”ie=edge”>
<title>Doc</title>
</head>
<physique>
</physique>
</html>
Now to make use of PyScript, add the next traces to the <head> part within the HTML template.
<hyperlink rel=”stylesheet” href=”https://pyscript.internet/alpha/pyscript.css” />
<script defer src=”https://pyscript.internet/alpha/pyscript.js”></script>
It is best to have one thing like this;
<html>
<head>
<meta charset=”UTF-8″>
<meta identify=”viewport”
content material=”width=device-width, user-scalable=no, initial-scale=1.0, maximum-scale=1.0, minimum-scale=1.0″>
<meta http-equiv=”X-UA-Appropriate” content material=”ie=edge”>
<title>Doc</title>
<hyperlink rel=”stylesheet” href=”https://pyscript.internet/alpha/pyscript.css” />
<script defer src=”https://pyscript.internet/alpha/pyscript.js”></script>
</head>
<physique>
</physique>
</html>
You’ve efficiently arrange PyScript thus far. Now you’re able to plot some visualizations in your net browser.
Matplotlib Plots On Your Internet Browser with PyScript
The steps to plot a visualization with matplotlib and bokeh on an internet browser are a bit totally different.
Begin by making a line plot with matplotlib and exhibiting it within the net browser.
Loading matplotlib
To make your line plot, first, it’s a must to load matplotlib within the HTML file. You utilize the <py-env> tag for that within the snippet under.
<html>
<head>
<meta charset=”UTF-8″>
<meta identify=”viewport”
content material=”width=device-width, user-scalable=no, initial-scale=1.0, maximum-scale=1.0, minimum-scale=1.0″>
<meta http-equiv=”X-UA-Appropriate” content material=”ie=edge”>
<title>Doc</title>
<hyperlink rel=”stylesheet” href=”https://pyscript.internet/alpha/pyscript.css” />
<script defer src=”https://pyscript.internet/alpha/pyscript.js”></script>
<py-env>
– matplotlib
</py-env>
</head>
<physique>
<h1>Matplotlib</h1>
<py-script> print(“My Lineplot”)</py-script>
</physique>
</html>
To see the outcomes of this, it’s a must to open this HTML file in your net browser. On Pycharm, you’ll be able to simply try this by going to the upper-right nook and clicking on the Chrome icon.
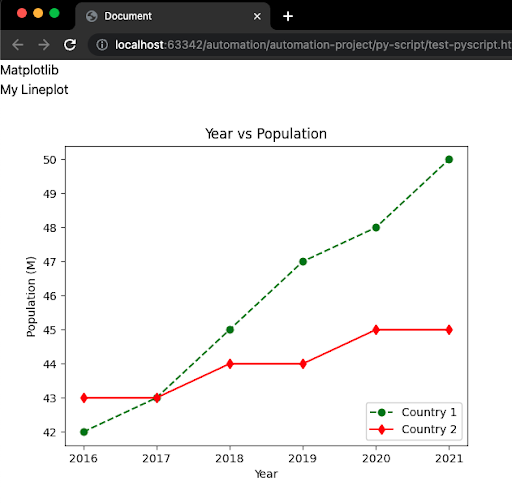
Displaying a line plot on the internet browser
Earlier than you write Python code to create a line plot, within the <physique> part it’s a must to create a <div> that may include the id of this plot. The id might be “lineplot”
<div id=”lineplot”></div>
Right here’s the Python code to make the road plot;
# Python Code Goes Right here …
import matplotlib.pyplot as plt
fig, ax = plt.subplots()
year_1 = [2016, 2017, 2018, 2019, 2020, 2021]
population_1 = [42, 43, 45, 47, 48, 50]
year_2 = [2016, 2017, 2018, 2019, 2020, 2021]
population_2 = [43, 43, 44, 44, 45, 45]
plt.plot(year_1, population_1, marker=’o’, linestyle=’–‘, colour=’g’, label=’Nation 1′)
plt.plot(year_2, population_2, marker=’d’, linestyle=’-‘, colour=’r’, label=’Nation 2′)
plt.xlabel(‘12 months’)
plt.ylabel(‘Inhabitants (M)’)
plt.title(‘12 months vs Inhabitants’)
plt.legend(loc=’decrease proper’)
fig
Should you put all the weather collectively, you must see the road plot under in your browser (it’d take a number of seconds to load).
Conclusion
Now you understand how to run visualizations on the internet browser with Python and HTML.
[ad_2]